Planning a trip to China? Whether you're dreaming of walking the Great Wall, closing a business deal in Shanghai, or studying Mandarin in Beijing, you'll need a Chinese visa first. The good news? The process has become remarkably easier for U.S. citizens, especially with recent updates that have eliminated many of the old hassles.
Gone are the days of scheduling appointments weeks in advance or scrambling to book flights before applying. The Chinese government has streamlined the entire process, making it more accessible than ever for American travelers.
What's Changed (And Why You'll Love It)
Walk Right In: Since October 23, 2023, you can literally walk into any Chinese consulate in the U.S. without an appointment. No more frantically refreshing booking websites or waiting weeks for an available slot. Just show up during business hours with your documents.
Tourist-Friendly Rules: Starting January 1, 2024, tourist visa applications became incredibly simple. Remember those stressful requirements for hotel bookings and flight itineraries? Gone. U.S. tourists no longer need to provide proof of accommodations or detailed travel plans upfront.
New COVA System (September 2025): On September 30, 2025, China launched an updated China Online Visa Application (COVA) system – your digital gateway to China. Every application now flows through this new platform. The photo upload step can be tricky — see Step 4 below for the full walkthrough with screenshots.
Choosing Your Visa Type: Your Purpose Determines Your Path
Think of Chinese visas like different keys – each one opens specific doors. Choosing the wrong type is like trying to unlock your front door with your car key: frustrating and ultimately unsuccessful.
Tourist (L) Visa: The most popular choice for Americans exploring China's wonders. Perfect for sightseeing, visiting friends, or that long-awaited cultural adventure. The best part? It typically comes with a 10-year validity, meaning one application can cover multiple trips.
Business (M) Visa: Your gateway to China's bustling commercial world. Whether you're attending trade shows, meeting suppliers, or exploring business opportunities, this visa covers all commercial activities. Also typically issued for 10 years for U.S. citizens.
Student Visas: Planning to study in China? You'll need either an X1 visa (for programs longer than 180 days) or an X2 visa (for shorter courses or exchanges). The key difference: X1 requires converting to a residence permit after arrival, while X2 lets you stay for the entire approved period.
Work (Z) Visa: Moving to China for employment? This is your first step. Think of it as a temporary entry pass – once in China, you'll convert it to a work residence permit within 30 days.
Family Visas: Missing loved ones in China? Q visas are for visiting Chinese citizens or permanent residents, while S visas are for visiting foreigners living in China. Both come in short-term (Q2/S2) and long-term (Q1/S1) versions.
Pro tip: Getting this choice right from the start saves weeks of potential delays. When in doubt, consult the specific requirements below or contact the consulate directly.
Step 1: Your Digital Journey Begins at COVA
Ready to start your application? Head to consular.mfa.gov.cn/VISA – this is the only official portal for Chinese visa applications. Think of it as the digital equivalent of walking into a Chinese consulate, except you can do it in your pajamas.
Here's where many people make their first (and most costly) mistake: choosing the wrong location. COVA will ask "Where do you plan to apply for Chinese visa?" This isn't asking where you want to travel – it's asking which U.S. consulate will handle your application.
The Simple Steps:
- Find Your Region: Navigate to North America > United States of America
- Choose Your Consulate: This is crucial – select based on where you live, not where it's convenient
- Switch to English: Click the language toggle if the site appears in Chinese
- Get Your Application ID: Click "Start" and immediately write down the unique ID they give you – it's your lifeline if you need to retrieve your application later
Picking the Right Chinese Mission in COVA
Three-Step Selection Checklist
| 🪄 Action | Where & What You Click | Why It Matters / Extra Tips |
|---|---|---|
| 1. Know your "home" jurisdiction | Verify which embassy/consulate covers the state on your driver's license or utility bill address. | COVA will only let you finish the form and (if required later) book an appointment at the post you choose here. Wrong choice ⇒ start a new form from scratch. |
| 2. Open the drop-down | On COVA's first screen, under "Where do you plan to apply for Chinese visa?", click the City (Embassy / Consulate) field. | You'll see five U.S. options:<br>• Embassy – Washington D.C.<br>• Consulate General – Chicago<br>• Consulate General – Los Angeles<br>• Consulate General – New York<br>• Consulate General – San Francisco |
| 3. Lock it in | Highlight your mission and press Save & Next. | After you move past page 1 the field becomes read-only, so double-check before continuing. |
U.S. State-by-State Map (2025)
| Embassy / Consulate | States & Territories It Serves | Notes |
|---|---|---|
| Washington D.C. – Embassy | AL, AR, DE, DC, FL, GA, ID, KY, LA, MD, MS, MT, NE, NC, ND, OK, PR, SC, SD, TN, TX, UT, VA, WV, WY | Absorbed former Houston district; still handles Texas & Gulf states. |
| Chicago – Consulate General | CO, IL, IN, IA, KS, MI, MN, MO, WI | Covers the Midwest plus Colorado. |
| Los Angeles – Consulate General | Southern CA (Kern Co. southward), AZ, HI, NM, Pacific territories (Guam, CNMI, American Samoa) | Northern CA & Nevada belong to SF. |
| New York – Consulate General | CT, MA, ME, NH, NJ, NY, OH, PA, RI, VT | Northeast plus Ohio & Pennsylvania. |
| San Francisco – Consulate General | Northern CA, NV, OR, WA, AK, ID, MT, WY | Handles the Pacific Northwest and Nevada. |
Border-Line Cases
• California: Kern County is the divider — south of Kern = Los Angeles; north = San Francisco.
• Students or temps in another state: use the state where you physically live now and bring proof (lease, student ID).
• Recent movers: update your ID or carry a utility bill so the consulate accepts your choice.
Quick Jurisdiction FAQ
| Question | Short Answer |
|---|---|
| Can I pick a "faster" consulate instead? | No. If your address isn't in its district, COVA/AVAS will block the appointment. |
| Chose the wrong city by accident? | Before submitting, go Back and fix it. After submission, create a new application. |
| Travelling soon but moving states meanwhile? | Apply before you move, or wait until you have proof of the new address. |
| Does the departure airport matter? | Not at all; only your residential address matters. |
| Still unsure? | Check the consulate's "Jurisdiction" notice or call their visa window. |
Bottom Line: Pick the mission that governs the state on your proof-of-address, lock it in on page 1 of COVA, and you'll sail through the rest of the application with no jurisdiction surprises.
Step 2: Filling Out Your Digital Visa Application
Now comes the meat of the process – the COVA form itself. Think of this as a detailed conversation with a consular officer, except you have all the time you need to get it right. After selecting your consulate, COVA will generate your unique Application ID – treat this like gold and save it immediately.
The Art of Form Completion
Personal Details: This might seem straightforward, but it's where many applications stumble. Your name must match your passport exactly – not just close enough. "Michael" vs "Mike" or a missing middle initial can trigger rejection. Double-check every letter, including any suffixes like "Jr." or "III."
Your Travel Story: Here's where you paint a picture of your trip. Choose your visa type carefully – this determines everything that follows. Planning to visit the Great Wall? That's tourist (L). Meeting suppliers in Guangzhou? Business (M) it is. The form will ask for detailed itineraries, so even if you're just touring, think through your likely stops and approximate dates.
Professional Background: This section helps establish your ties to the U.S. – essentially proving you have reasons to return home. Use your employer's full, official name (not "XYZ Corp" but "XYZ Corporation, Inc."). Include a physical address, never a P.O. Box. If you're retired or between jobs, be honest – it's not disqualifying.
The Security Questions: These yes/no questions cover criminal history, previous visa denials, and health issues. The vast majority of applicants will check "no" to everything, but if you do have something to declare, provide a brief, honest explanation. Lying here is far worse than any past issue you might have.
Additional Details
- Previous visits to China
- Previous Chinese visas (provide copies if available)
- Dual citizenship declarations
Form Submission Tips
- Double-check every field before submission
- Ensure phone numbers and emails are correct
- Use full names and addresses (no abbreviations)
- Sign and date the printed form - forgetting to sign is a common rejection cause
- Print all pages single-sided
- Download and save the PDF confirmation
Step 3: Gathering Your Documents - What You Actually Need
Here's where the 2024 simplifications really shine, especially for tourists. The days of printing flight confirmations for trips you haven't booked yet are over.
Tourist Visa (L) - The Easiest Path to China
Good news for travelers: this is now the simplest visa application you'll ever complete. Here's your entire checklist:
Your Essential Documents:
- Valid U.S. passport (needs 6+ months remaining validity and at least one blank page for the visa sticker)
- Printed and signed COVA form (remember to actually sign it – unsigned forms get rejected instantly)
- One compliant Chinese visa photo (33mm x 48mm, not the standard U.S. 2x2 size)
- Previous Chinese visa copy (if you've had one before – this actually helps your case)
What You DON'T Need Anymore (thanks to 2024 rule changes):
- ❌ Flight itineraries or bookings
- ❌ Hotel reservations
- ❌ Invitation letters from friends in China
- ❌ Detailed day-by-day travel plans
This streamlined approach means you can apply for your visa before finalizing your travel plans – a huge relief for flexible travelers.
Business Visa (M)
Required Documents:
- Valid passport + copy of data page
- Printed and signed COVA form
- Compliant photo
- Business invitation letter from Chinese company (on letterhead, signed/stamped)
- Previous Chinese visa copy (if applicable)
Student Visas (X1 & X2)
X1 Visa (Long-term study > 180 days):
- Passport + copy
- COVA form + photo
- Original Admission Notice from Chinese university
- Original JW201/JW202 form (visa application for study)
- Previous X visa copies
X2 Visa (Short-term study ≤ 180 days):
- Passport + copy
- COVA form + photo
- Copy of Admission Notice from institution
- Confirmation of enrollment document (no JW202 needed)
Work Visa (Z)
Required Documents:
- Passport + copy (6+ months valid)
- COVA form + photo
- "Notification Letter of Foreigner's Work Permit" (most crucial document)
- Invitation letter from Chinese employer
- Previous residence permit copy (if applicable)
Family Visit Visas
Q1/Q2 (visiting Chinese citizens or permanent residents):
- Passport + copy
- COVA form + photo
- Invitation letter from family member in China
- Copy of inviter's Chinese ID card
- Proof of relationship (birth certificate, marriage certificate, etc.)
S1/S2 (visiting foreigners residing in China):
- Passport + copy
- COVA form + photo
- Invitation letter from foreign resident family member
- Copy of inviter's passport + Chinese residence permit
- Proof of relationship documentation
Step 4: Chinese Visa Photo — Upload and Adjustment Walkthrough
Your photo is critical — improper photos are a leading cause of rejection. For the spec sheet, see our Chinese visa photo requirements guide. Here's how to actually get it accepted by COVA.
Specifications (Quick Reference)
- Print size: 33mm × 48mm
- Digital: 354×472 to 420×560 pixels, 40–120 KB, JPEG
- Background: Pure white, no shadows
- Expression: Neutral, facing camera, ears visible, no tilting
- Recent: Taken within last 6 months, color only
Uploading Your Photo in COVA
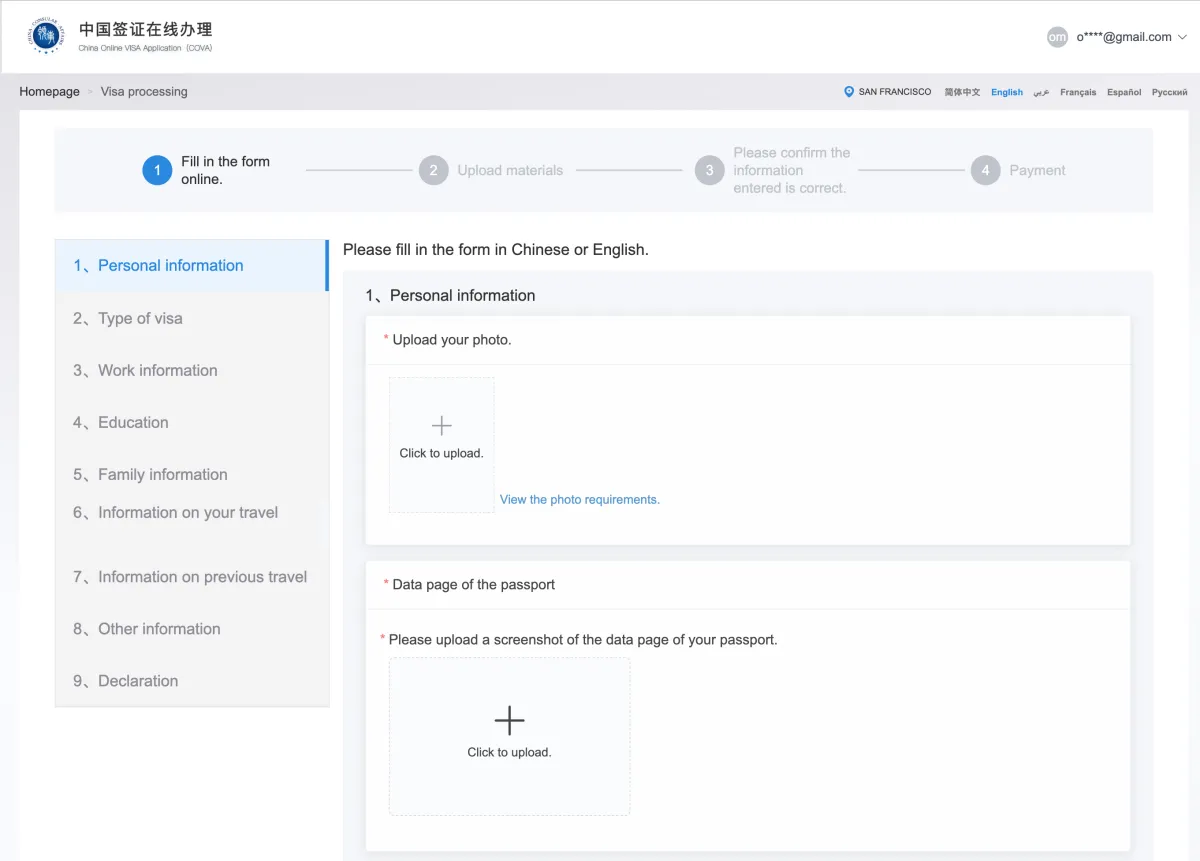
Under Personal Information, click "+ Click to upload" and select your JPEG. If you're a Snap2Pass user, start with the file ending in -order.jpg.
Adjusting to Fit the Oval Guides
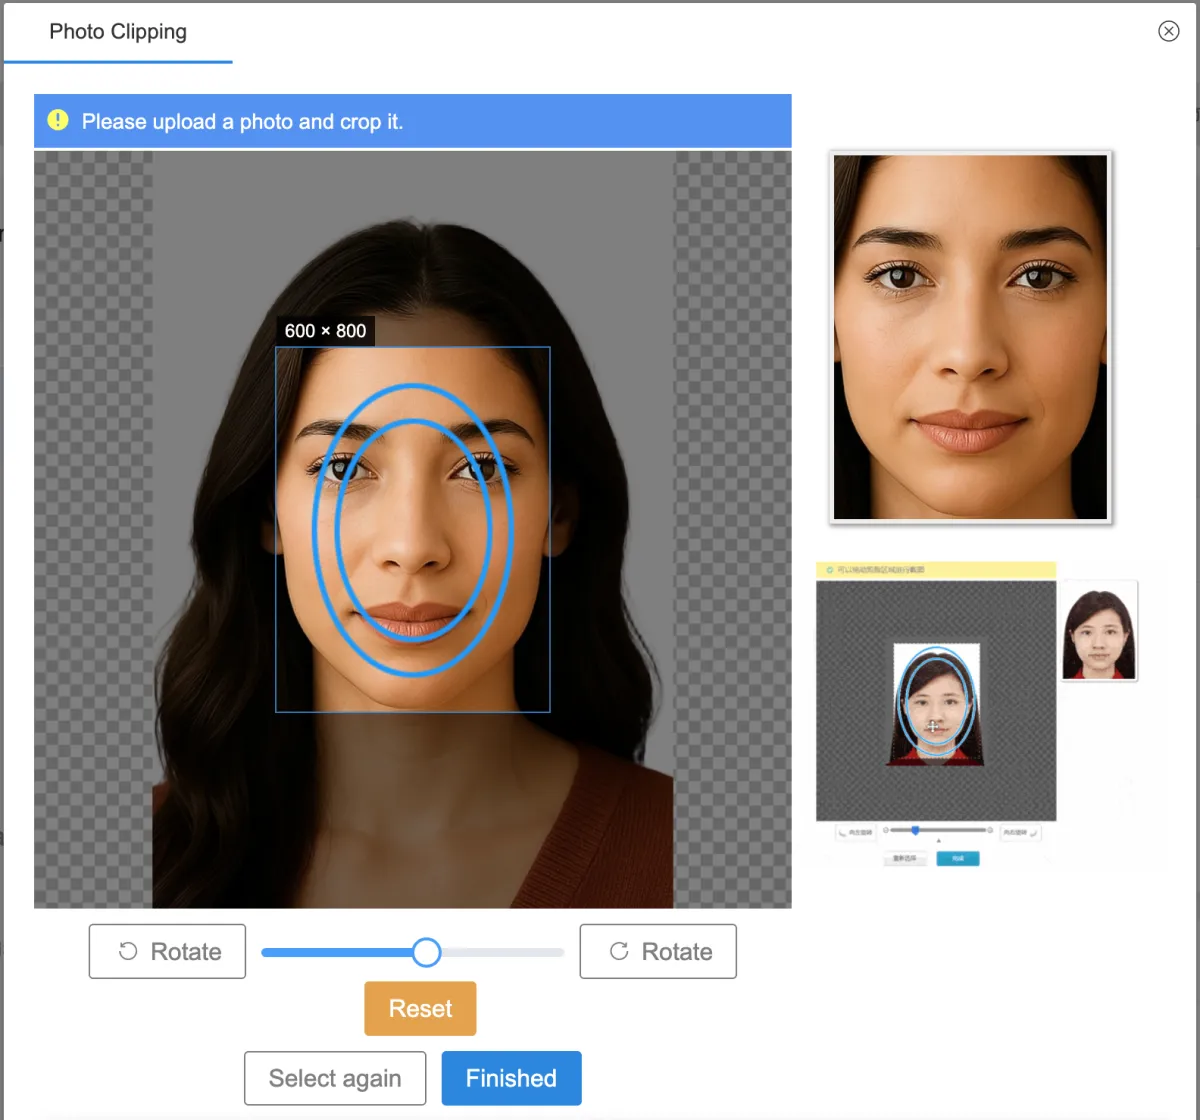
The COVA system shows your photo with blue oval guides. Default positioning is often wrong — your face appears too large or off-center. Use the controls at the bottom:
- Zoom OUT with the slider until your face fits inside the ovals.
- Drag the photo to center your head between the upper and lower oval.
- Rotate if your photo is tilted.
- Confirm that the white background fills the entire frame.

If the photo still won't fit even when fully zoomed out: use the file ending in -background_replaced.jpg from your Snap2Pass email. It has extra padding around your face that gives COVA's adjustment tool more room to work with.
Click "Finished" when aligned.
Known Issue: "The photo check failed."

This is a documented bug in the new COVA system (launched September 2025) — not a problem with your photo. Chinese authorities are aware and working on a fix.
- Continue your application — the error does not block submission.
- Consular officers manually review photos and accept compliant ones during the in-person review.
- Compliant means: 33×48mm, white background, ears visible, neutral expression, color, no filters.
If you see a different error, recheck the JPEG format, dimensions (354–560px height), and background.
You Still Need a Print Photo
Even after successful digital upload, bring an identical 33×48mm print to the consulate. Walk-in print options: Walgreens or CVS same-day.
Step 5: The Consulate Visit - Easier Than You Think
Remember when you had to schedule visa appointments weeks in advance, constantly refreshing websites hoping for a cancellation? Those days are over. Since 2023, you can simply walk into any Chinese consulate during business hours.
Timing Your Visit
The Sweet Spot: Aim to arrive 30-60 minutes before opening time, especially in busy cities like San Francisco or Los Angeles. Yes, you might wait outside, but you'll be among the first served when doors open.
Office Hours Vary: Most consulates operate from around 9:00 AM to 1:00-2:30 PM on weekdays. Check your specific consulate's hours beforehand – showing up during lunch break won't help anyone.
What to Expect Inside
Think of it like a sophisticated DMV experience – organized, efficient, but requiring patience during busy periods.
- Security First: You'll pass through airport-style security. Leave large bags at home.
- Get Your Number: Most consulates use a ticketing system. Take a number and wait for it to be called.
- The Interview: Don't worry – it's more of a document review. The officer will ask simple questions like "What's the purpose of your visit?" Keep answers consistent with your application.
- Digital Fingerprints: If you haven't applied for a Chinese visa in the past 5 years, they'll scan your fingerprints. It's quick and painless.
- Get Your Receipt: This small piece of paper is your golden ticket. Guard it carefully – you'll need it to collect your passport.
Money Matters: Here's a key detail – you don't pay anything during submission. Payment happens when you pick up your approved visa.
Step 6: Processing Time and Fees
Standard Processing
- Regular service: 4 working days
- Express service: 2-3 working days (+$25 fee)
- Rush service: Emergency cases only (proof required)
Fees for U.S. Citizens
| Visa Type | Fee |
|---|---|
| Tourist (L) — 10-year multi-entry | $68 |
| Tourist (L) — single, double, or multi-entry under 10 years | $140 |
| Business (M), Student (X1/X2), Work (Z), Family (Q1/Q2), Crew (C) | $140 |
| Express service surcharge | +$25 |
- Payment methods: Credit/debit card, money order, cashier's check
- Not accepted: Cash, personal checks
- When you pay: At pickup, not at submission
What to Expect
- 10-year multiple-entry visas typical for L and M visas
- Single-entry visas for X1, Z, Q1, S1 (convert to residence permit after arrival)
- No online tracking - rely on pickup date provided
Step 7: Pickup Your Passport
Return on the specified pickup date with your receipt:
- Bring your pickup receipt (essential)
- Pay the visa fee at cashier window
- Collect your passport and check visa details immediately
- Verify information before leaving (name, passport number, visa type, validity)
Common Mistakes to Avoid
Top Rejection Causes
- Incorrect photo (wrong size, background, shadows)
- Unsigned application form
- Incomplete or incorrect information
- Wrong consular jurisdiction
- Missing required documents for visa type
- Mismatched purpose and supporting documents
Best Practices
- Use professional photo services familiar with Chinese visa requirements
- Double-check all form fields before submission
- Organize documents in order of checklist
- Bring extra printed photos (33×48mm) as backup - see printing guides
- Apply 2-4 weeks before travel date
- Having trouble with COVA photo upload? See Step 4 above for the screenshot walkthrough and "photo check failed" workaround
Location-Specific Tips
Walk-in Service Tips
- Arrive early: 30-60 minutes before opening in busy cities
- Bring entertainment: Lines can be long during peak times
- Check holiday schedules: Consulates close for both U.S. and Chinese holidays
Transportation
- Limited parking at most urban consulates
- Use public transit in cities like New York and San Francisco
- Plan extra time for security and wait times
After Getting Your Visa
In China Requirements
- Register with police within 24 hours (hotels do this automatically)
- Convert long-term visas (X1, Z, Q1, S1) to residence permits within 30 days
- Carry passport with valid visa at all times
Visa Validity
- Enter before date: Must arrive in China before visa expiration
- Duration per stay: Typically 60 days for tourists, 90 days for business
- Multiple entries: Can enter/exit multiple times during validity period
Emergency Situations
For urgent travel needs (family emergency, critical business):
- Contact consulate by phone/email with documentation
- Provide proof of emergency (hospital letter, death certificate, etc.)
- Same-day or next-day processing possible for true emergencies
Visa-Free Alternatives
Consider if your trip qualifies:
- 144-hour transit visa-free: For specific cities when transiting to third country
- Group tours: Some visa-free options for organized tours
- Check current policies as these frequently change
Sources
All information compiled from official and authoritative sources. Last updated July 10, 2025.
Official Government Sources
- China Online Visa Application (COVA) - Official visa application portal
- Appointment for Visa Application Submission (AVAS) Portal - Ministry of Foreign Affairs appointment system
- Embassy of the P.R.C. in the United States - Visa Requirements & Procedures - Published June 14, 2022
- Consulate-General of China in Los Angeles - Processing Time & Visa Fees Notice - Published December 11, 2023
- Embassy of the P.R.C. - 2025 Holiday & Office-Closure Schedule - Published January 2025
Recent Policy Updates
- Notice on Walk-in "No Appointment" Visa Service for All Applicants - Embassy of the P.R.C. in the United States, Published October 21, 2023
- Tourist-Visa (L) Application Documents to be Simplified - Embassy of the P.R.C. in the United States, Published December 30, 2023
- Notice on Adjustment of Consular Jurisdiction - Embassy of the P.R.C. in the United States, Published June 29, 2024
- Notice on Extension of Temporary Visa-Fee Reduction (Non-U.S. Nationals) - Embassy of the P.R.C. in the United States, Published December 27, 2024
Photo Requirements Documentation
- Visa-Photo Requirements (48 mm × 33 mm) - Chinese Visa Application Service Center, Published February 2024
- Official Photo Specifications for Chinese Visa (PDF) - Consulate-General of China in Alexandria, Published 2021
News and Updates
- China Relaxes Visa Rules for U.S. Travelers, Cuts Proof Requirements - Washington Post, Published July 5, 2025
- U.S. State Department - China Travel Advisories - Official U.S. government travel information