This guide explains how to correctly upload your Chinese visa photo through the official China Online Visa Application (COVA) system, launched on September 30, 2025. It includes every step—from selecting your photo and cropping it correctly, to understanding what happens after your upload is accepted.
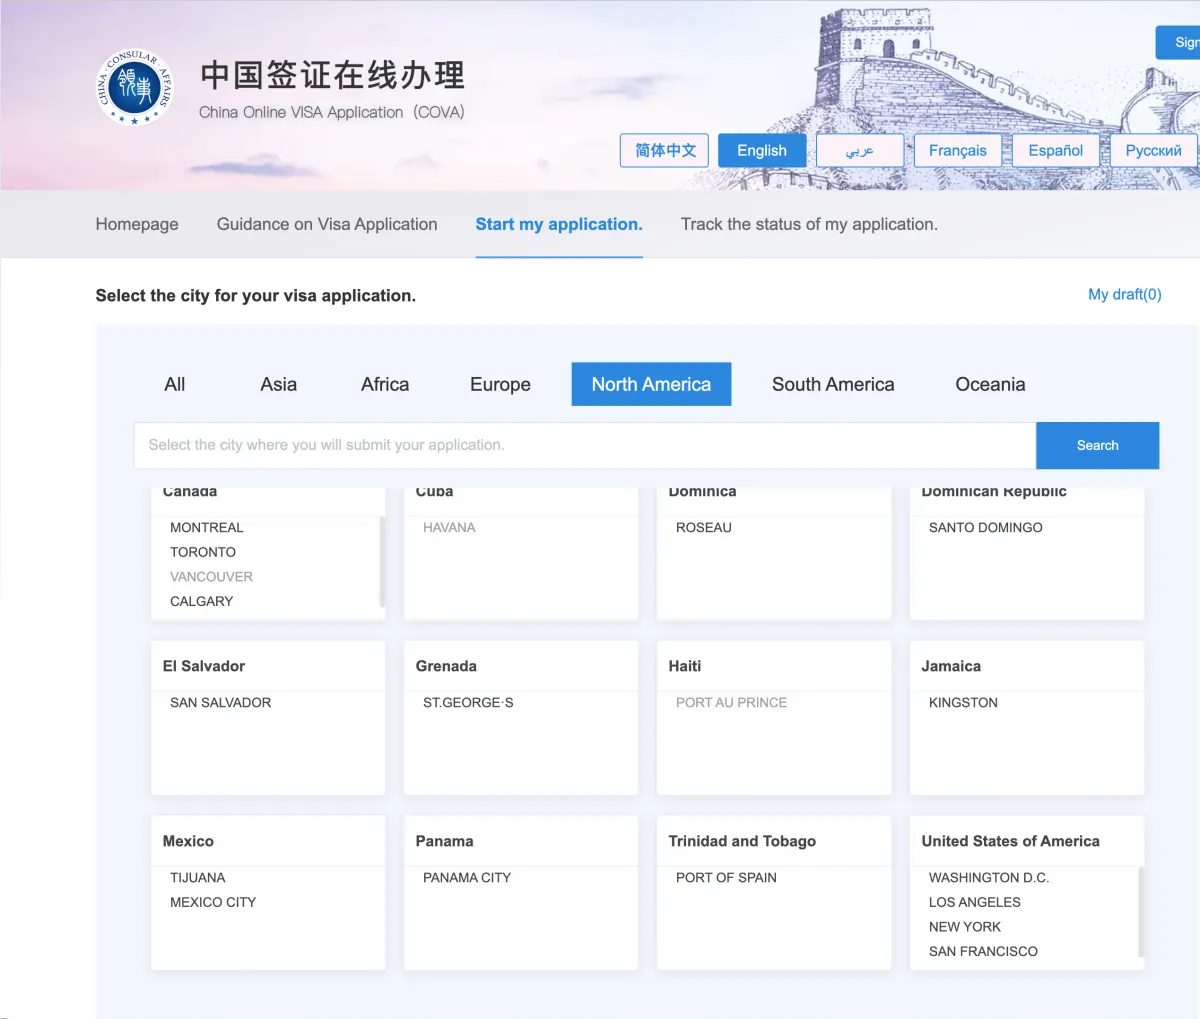
Step 1: Go to the COVA Portal
Visit the official China Online Visa Application (COVA) website.

What to do:
- Choose English from the language bar.
- Click "Start my application."
- Select your region (e.g., North America) and your visa office city — such as San Francisco, Los Angeles, New York, or Washington D.C.
📍 Tip: Choose the city based on your state of residence. Applying under the wrong jurisdiction can delay or invalidate your application.
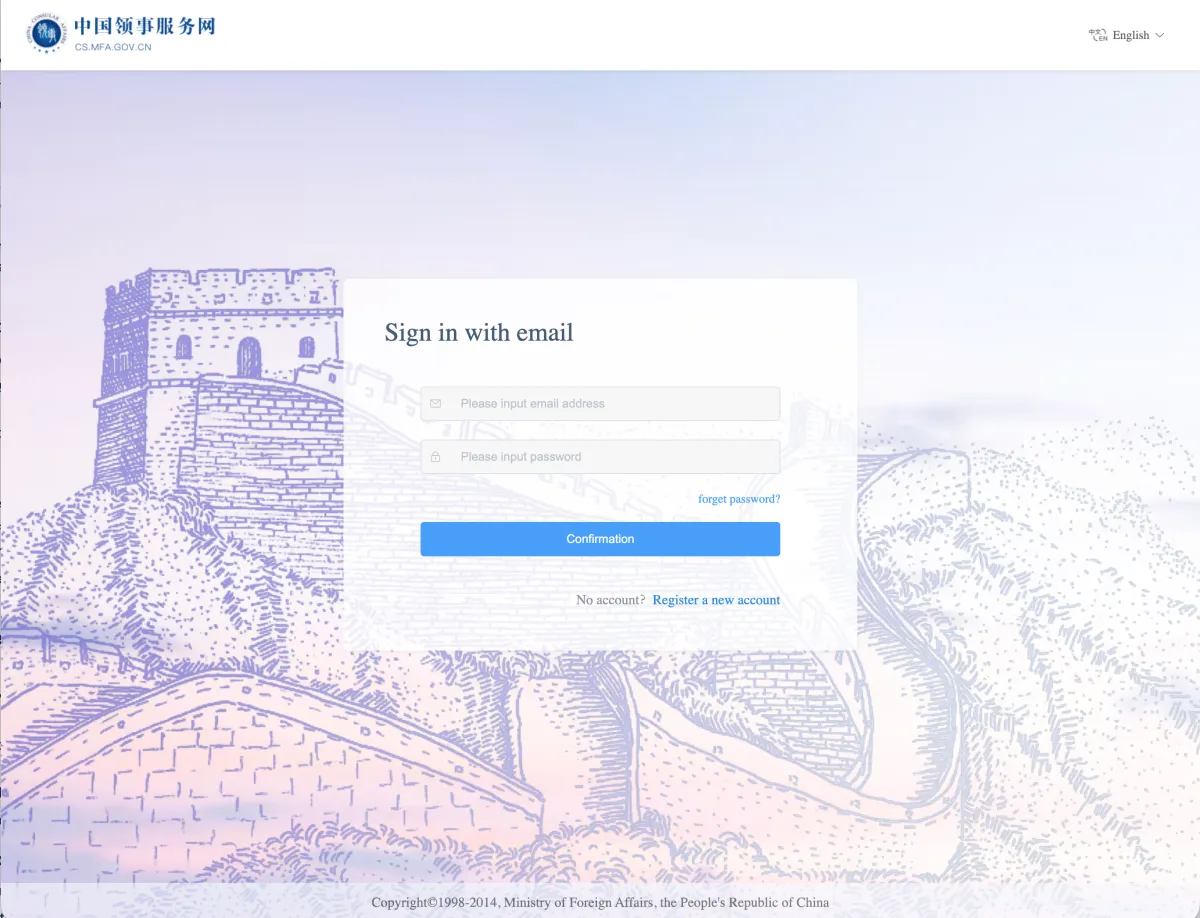
Step 2: Sign In or Create an Account

If you already have an account:
- Enter your email and password.
- Click "Confirmation."
If you're new:
- Click "Register a new account."
- Enter your email and password.
- You'll receive a verification code via email — copy and paste it to confirm your registration.
📍 Tip: Use an active email address — this is where you'll receive your Application ID, status updates, and appointment information.
Step 3: Review the Guidelines and Begin the Application

You'll see a "Guidelines for Filling in the Form" page before starting.
Key points:
- Fill the form carefully — no edits allowed after submission.
- Applications are valid only for entry within 90 days.
- Fill out the form in English or Chinese only.
Click "Start filling in the form."
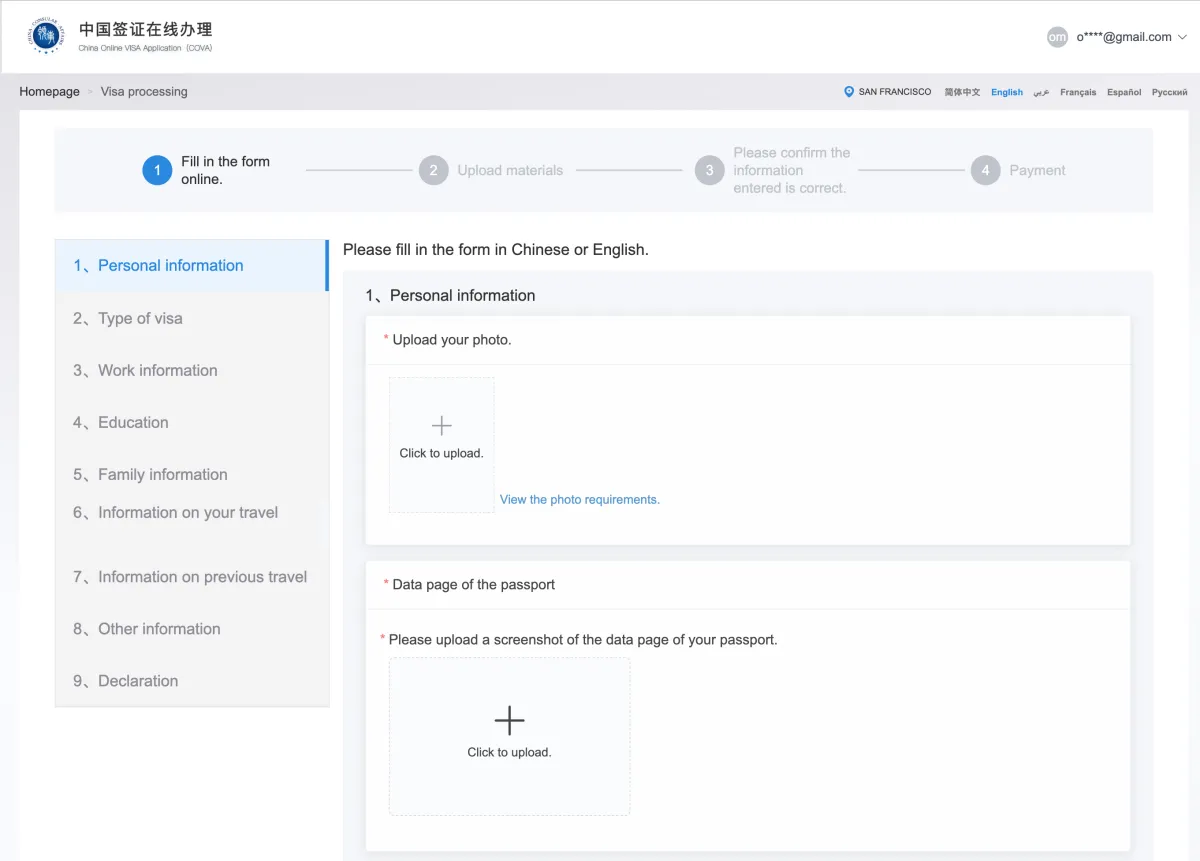
Step 4: Upload Your Photo

Under Personal Information, the first section requests your visa photo.
Requirements:
- Size: 33×48 mm
- Format: JPEG (354×472–420×560 px, 40–120 KB)
- Background: Plain white or near-white
- Visibility: Both ears visible, face forward, no shadows
- Expression: Neutral, eyes open, mouth closed
Click "+ Click to upload."
Step 5: Initial Photo Preview

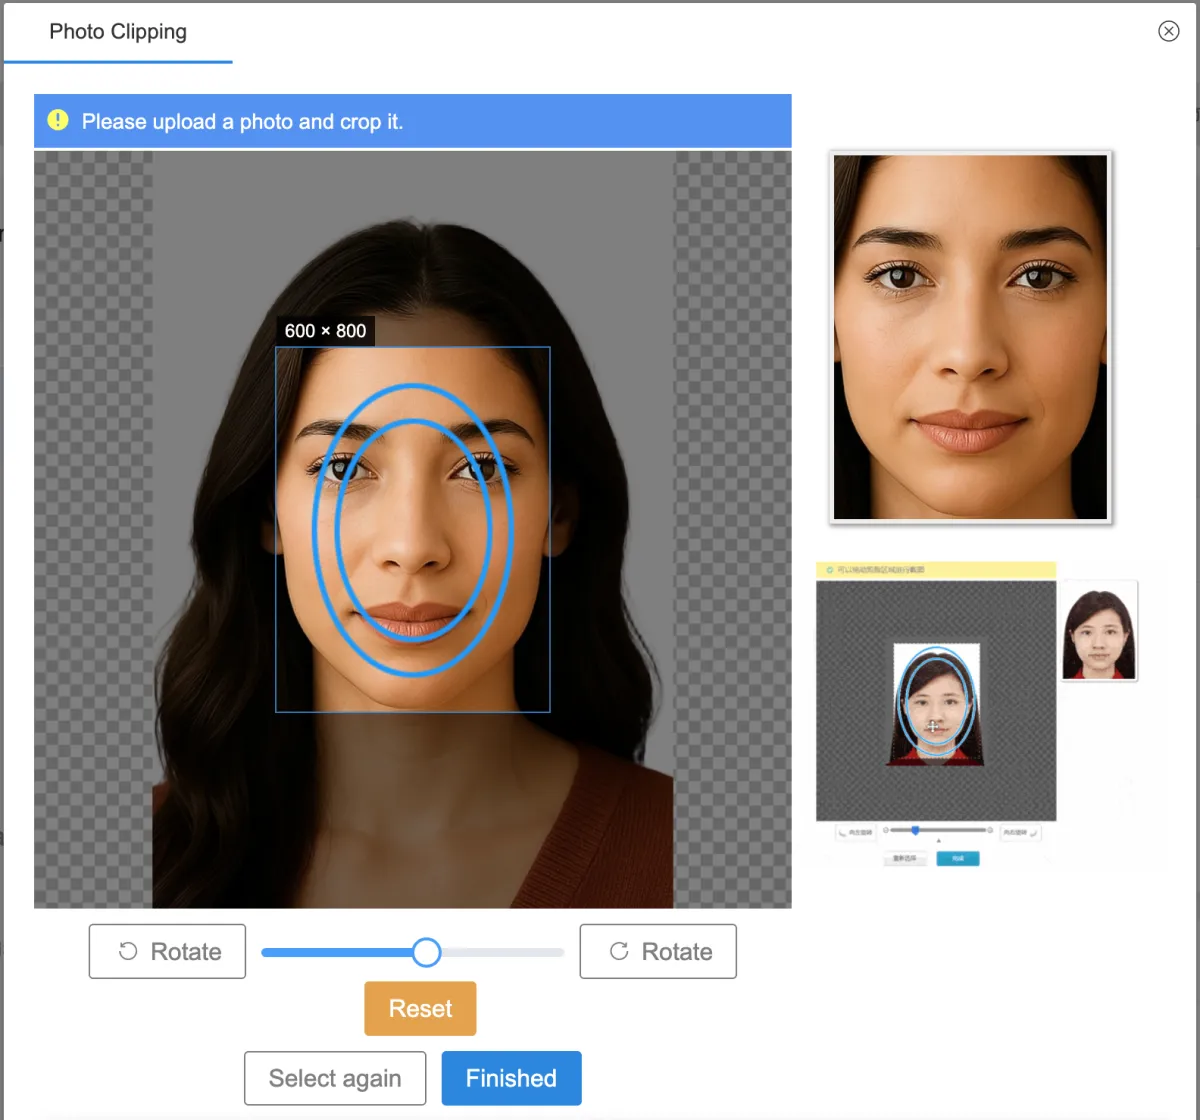
After uploading your photo, the COVA system displays it with adjustment tools.
What you see:
- Your uploaded photo with blue oval guides overlaid
- Default positioning (often the face appears too large or off-center)
- Adjustment controls at the bottom: zoom slider, rotation buttons, and reset option
💡 Snap2Pass users: If you used our Chinese visa photo service, start with your "Chinese Visa" photo (the one ending with -order.jpg).
📍 Note: Most photos will need adjustment in the next step to fit properly within the oval guides.
Step 6: Adjust Photo to Fit Guidelines

Now you need to adjust your photo to fit the oval guides correctly.
How to adjust:
- Use the zoom slider to zoom OUT so your face fits inside the oval circles
- Drag the photo to center your head within the oval guide
- Click Rotate if your photo is tilted
- Ensure white background fills the entire frame
Alignment goals:
- The top of your head should touch the upper oval
- Your chin should align with the lower oval
- Your entire face fits comfortably within the guides
If your photo still doesn't fit even when zoomed out completely:
- Try the file ending with "-background_replaced.jpg" from your email instead
- This version has extra padding around your face for easier adjustment
- The standard photo may be too tightly cropped for COVA's manual adjustment tool
Once properly aligned, click "Finished" to confirm your selection.
Step 7: Confirm Photo Upload

Once uploaded, COVA automatically checks your image for compliance.
Successful upload shows:
- ✅ Your image preview appears clearly.
- ✅ A green check mark displays: "Your photo is accepted."
Common Error: "The photo check failed."
This is a known issue with the new COVA system. If you see this error message even though your photo meets all requirements:
- Don't worry - This is a platform bug, not a problem with your photo
- Continue with your application - You can proceed despite this error message
- Your photo is still valid - Consular officers manually review photos and accept compliant ones
- Chinese authorities are aware of this issue and working on a fix
⚠️ Important: If you used Snap2Pass or have a photo that meets the official specifications (33×48mm, white background, ears visible, neutral expression), proceed with confidence. The automated system error does not affect the final manual review by consular officers.
Other technical errors:
If you see a different error message:
- Recheck the background lighting and ensure JPEG format
- Confirm size (33×48 mm or 354–560px height)
- Avoid using selfies or filtered photos
📍 Tip: Once your photo is uploaded (even with the "check failed" error), it is linked to your visa application. Continue filling out the rest of the form.
Step 8: What Happens Next — After Photo Upload
Once your photo is accepted and you finish completing the rest of the online form, your COVA application enters the review and submission phase managed by the Chinese Embassy or Consulate.
1. Online Preliminary Review
- Consular officers review your submitted form, photo, and attachments.
- If corrections are needed, your status changes to "Rejected and to be modified."
- You'll need to log back in, edit the form, and resubmit within 30 days.
2. "Passport To Be Submitted" Status
If your application passes the online review:
- Your status updates to "Passport to be submitted."
- You (or your authorized agent) must visit the visa center or consulate selected earlier.
Bring:
- 🛂 Your physical passport
- 🧾 Printed application information page with barcode
- 📄 Any required supporting documents
⚠️ Submitting the online form alone does not mean your visa has been approved. The final decision is made by the Chinese Embassy or Consulate after in-person review.
3. Interview or Additional Documents (If Required)
- The consulate may request an interview or additional documents.
- This is decided case-by-case during the review process.
4. Visa Issuance and Collection
- Once approved, the visa will be affixed to your passport.
- You'll collect your passport from the visa office or receive it via mail (if available).
Step 9: Quick Checklist ✅
Before submitting your application:
- Complete all 9 COVA sections (Personal info → Declaration)
- Upload all required files (photo, passport data page, etc.)
- Confirm all details — no edits allowed after submission
- Watch for status changes ("Rejected," "Passport to be submitted")
- Prepare your passport and printed confirmation for the visa center
Important Reminders
You Still Need a Print Photo
Even after successful digital upload, you must bring an identical 33×48mm print photo to the consulate and attach it to your printed COVA form.
Need to print your photos? Check our printing guides:
- How to Print Passport Photos at Walgreens
- How to Print Same Day Photos at CVS
- Amazon Photo vs Walgreens: Best Option for Printing
Retrieving Your Application Later
If you need to return to your application:
- Go to consular.mfa.gov.cn/VISA
- Click Retrieve Application
- Enter your Application ID and passport number
- Your photo and all entered data will be preserved
Common Upload Issues and Solutions
Known Issue: "The photo check failed." Error
This is a common issue with the new COVA system. Chinese authorities are aware and working on a fix.
Problem: The new COVA system (launched September 2025) sometimes displays "The photo check failed." error message even when photos meet all official requirements.
Solution:
- This error is a known platform bug, not an issue with your photo
- Continue filling in the form despite the error message
- Your application can still be submitted and processed successfully
- Photos meeting official specifications (33×48mm, white background, ears visible) are accepted by consular officers during review
⚠️ Important: If you receive this error with a compliant photo from Snap2Pass, proceed with your application. The final review is done by consular officers who evaluate actual compliance, not the automated system.
Other Technical Issues
| Problem | Solution |
|---|---|
| File too large | Compress image or reduce quality slightly |
| File too small | Use higher resolution source image |
| Wrong dimensions | Crop/resize to 354×472 minimum |
| Background not white | Retake photo with pure white background |
| Face too small/large | Use size slider to adjust proportion |
| Photo appears tilted | Use rotation buttons to level |
Summary
Uploading a compliant photo is the most crucial step in the COVA application process. A properly aligned, correctly sized, and approved photo ensures a smooth review and prevents delays or rejection.
Once the COVA system confirms "Your photo is accepted," your online part is complete — all that's left is to finish the form and submit your passport in person when prompted.
Need help preparing your image? Snap2Pass automatically formats, crops, and validates your photo for the new COVA system — ensuring guaranteed acceptance.
Next Steps
After successfully uploading your photo:
- Complete the remaining COVA form sections
- Print your entire application
- Print your physical 33×48mm photo and attach it to the printed form
- Gather your supporting documents
- Visit your consulate for submission
For the complete visa application process, see our comprehensive Chinese visa application guide.
Official Source References
All information compiled from official and authoritative sources. Last updated October 16, 2025.
Official Government Sources
- Chinese Embassy in the United States – Visa Application Announcement (Sept 2025)
- China Online Visa Application (COVA) System
- Chinese Visa Application Service Center
Technical Documentation
- Visa-Photo Requirements (48 mm × 33 mm) - Chinese Visa Application Service Center
- Official Photo Specifications for Chinese Visa - Consulate-General of China in Alexandria
